
Set the default font for New and Reply emails
Lest start with the setup of the font on the body of new and reply emails.
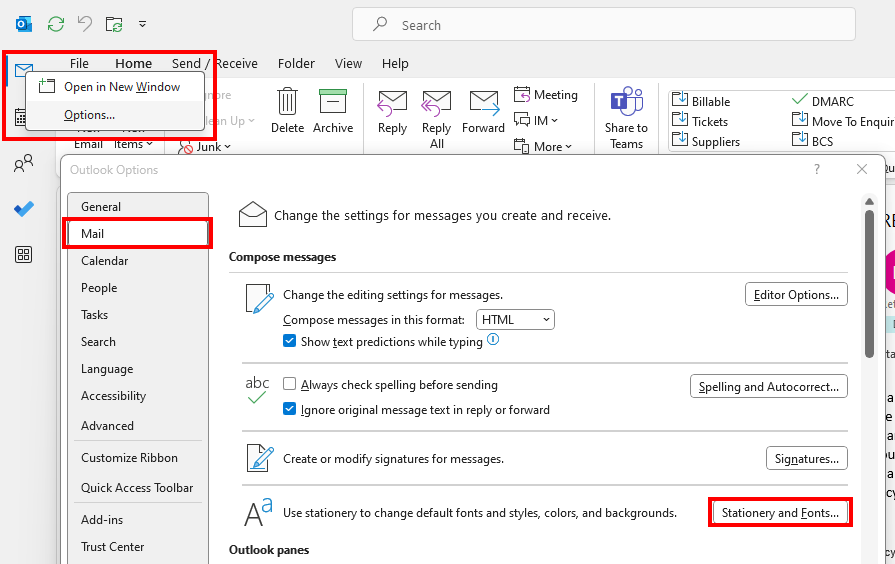
- Go to File > Options (or right click the Mail icon and choose Options)
- Click Mail > Stationery and Fonts
To keep an unified set of fonts for of all the emails we send, we need to follow these next steps three times, one for the New mail messages (1) we’ll send, one for the Replies and Forwarding (2) and once more the emails in Plain Text (3), this last one is used rarely, but if we want all the emails on the same font, it needs to be set up.

We click on the Font button under each of the emails we’re setting up to open the Font and size selection menu:

Once here, we only need to navigate to the chosen Font and size, select them and press Ok.
Then we just need to repeat the process for the other types of emails, points 2 and 3 of the previous picture.
Change the font for my next email only
If you only want to change the font as a one-off, we go to New email and set it there.
Pop-out the new email into a new window to create the message, go to the Format Text tab, and make sure that the cursor is in the body of the email you’re writing.
Choose your desired Font and Size.

Additionally, we can choose how to align the text or the justification.
If we want to change the format for our reply, instead of New Email, we Press Reply, and Pop Out the message. (If the email you are replying to is in Plain Text, you’ll also reply in Plain Text, so here you can also revert back to HTML).
Then we just follow the same steps of going to the Format Text Tab and choosing the desired Font and size.
Change the font and size for the Message Preview
The message preview is the middle pane in Outlook, and we can personalise it too.

To change how the middle pane displays the information, go to the View tab in Outlook, then View Settings.

Select Other Settings

Option 1 changes how Outlook displays the name of the sender and the preview of the text in the preview pane.
Option 2 changes the subject of the email in the preview.
Option 3 applies to the reading pane.


See some of out other useful tips for Outlook here.